Was this helpful?
Join our Discord community to ask questions, give feedback, or suggest improvements.
Join Discord[ RELATED ]
Join our Discord community to ask questions, give feedback, or suggest improvements.
Join DiscordTeam Recording allows you to record practice sessions from all 5 player cameras simultaneously. This is the only recording mode available on both web and desktop platforms.
Unlike other recording features, Team Recording streams all cameras live to CS2.CAM servers, making VODs available instantly after practice ends - no waiting for uploads or processing.
All 5 players start and stop recording at exactly the same time, ensuring perfect sync for review.
All cameras are streamed live to CS2.CAM, allowing coaches or teammates to watch in real-time.
As soon as practice ends, all VODs are immediately available - no upload or processing time needed.
Works from both the web interface and the desktop application, giving you flexibility in how you record.
Before starting your first team recording, there are some technical aspects to consider. CS2.CAM offers two recording methods with slightly different performance characteristics.
Record directly from the browser using screen sharing. No additional software needed, works on any computer.
Record using the desktop app with OBS Studio. Slightly better performance and more control over capture settings.
Here are performance benchmarks from our testing to help you choose the best method for your setup:
| Scenario | Avg FPS | P1 FPS | Impact |
|---|---|---|---|
| No Recording (Baseline) | 513.5 | 194.6 | — |
| Discord Screen Share | 449.1 | 187.0 | -12.5% |
| CS2.CAM Web Recording | 486.0 | 193.7 | -5.4% |
| CS2.CAM Desktop + OBS | 506.9 | 200.2 | -1.3% |
As you can see, both CS2.CAM methods have minimal performance impact compared to Discord screen sharing, with the desktop app having almost no measurable impact.
You must add the following launch option to CS2 for screen recording to work properly:
This option allows third-party software to capture CS2's screen. Without it, screen capture may show a black screen.
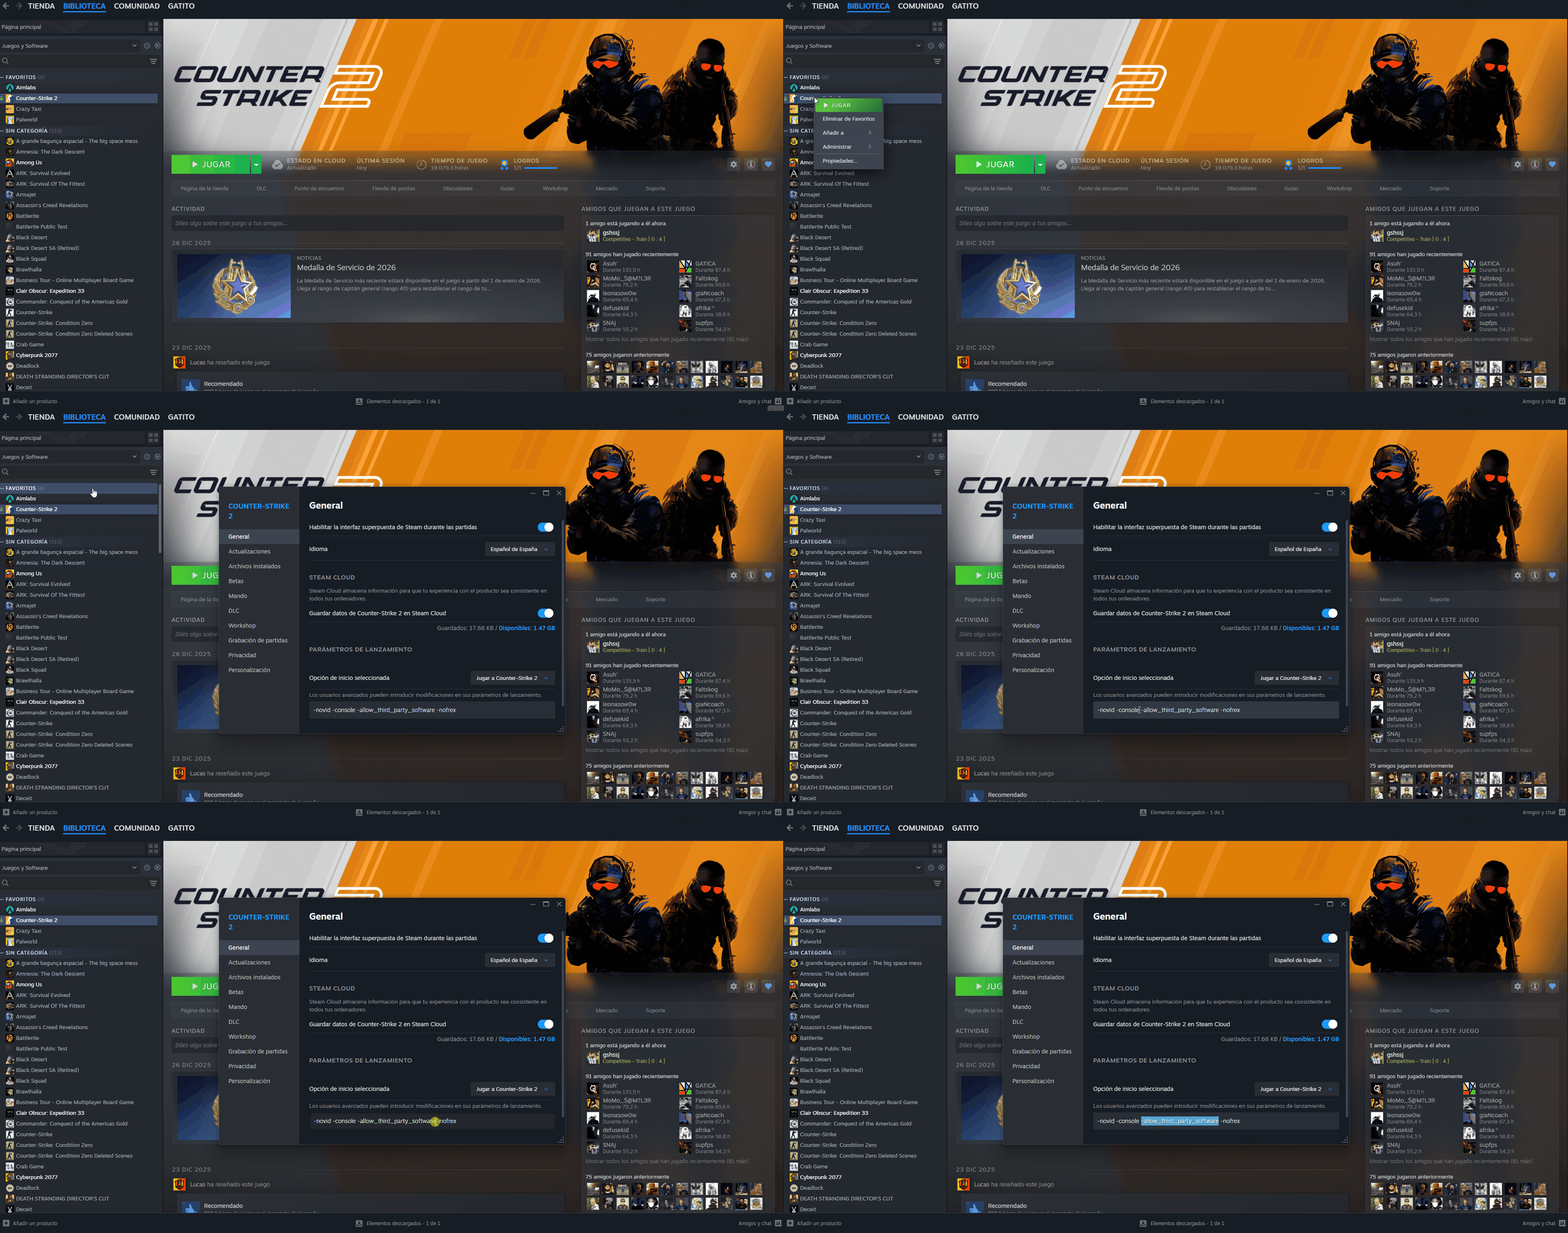
Adding the allow_third_party_software launch option to CS2
Recording from the web is the simplest method - no additional software required. Here's how to set it up:
Navigate to the Team Recording page from your team dashboard.
Click the Ready button to indicate you're prepared to record.
When prompted, select 'Entire Screen' and choose the monitor where CS2 is running.
Make sure to check 'Share system audio' to capture game sounds.
Enable microphone sharing to capture your voice comms during practice.
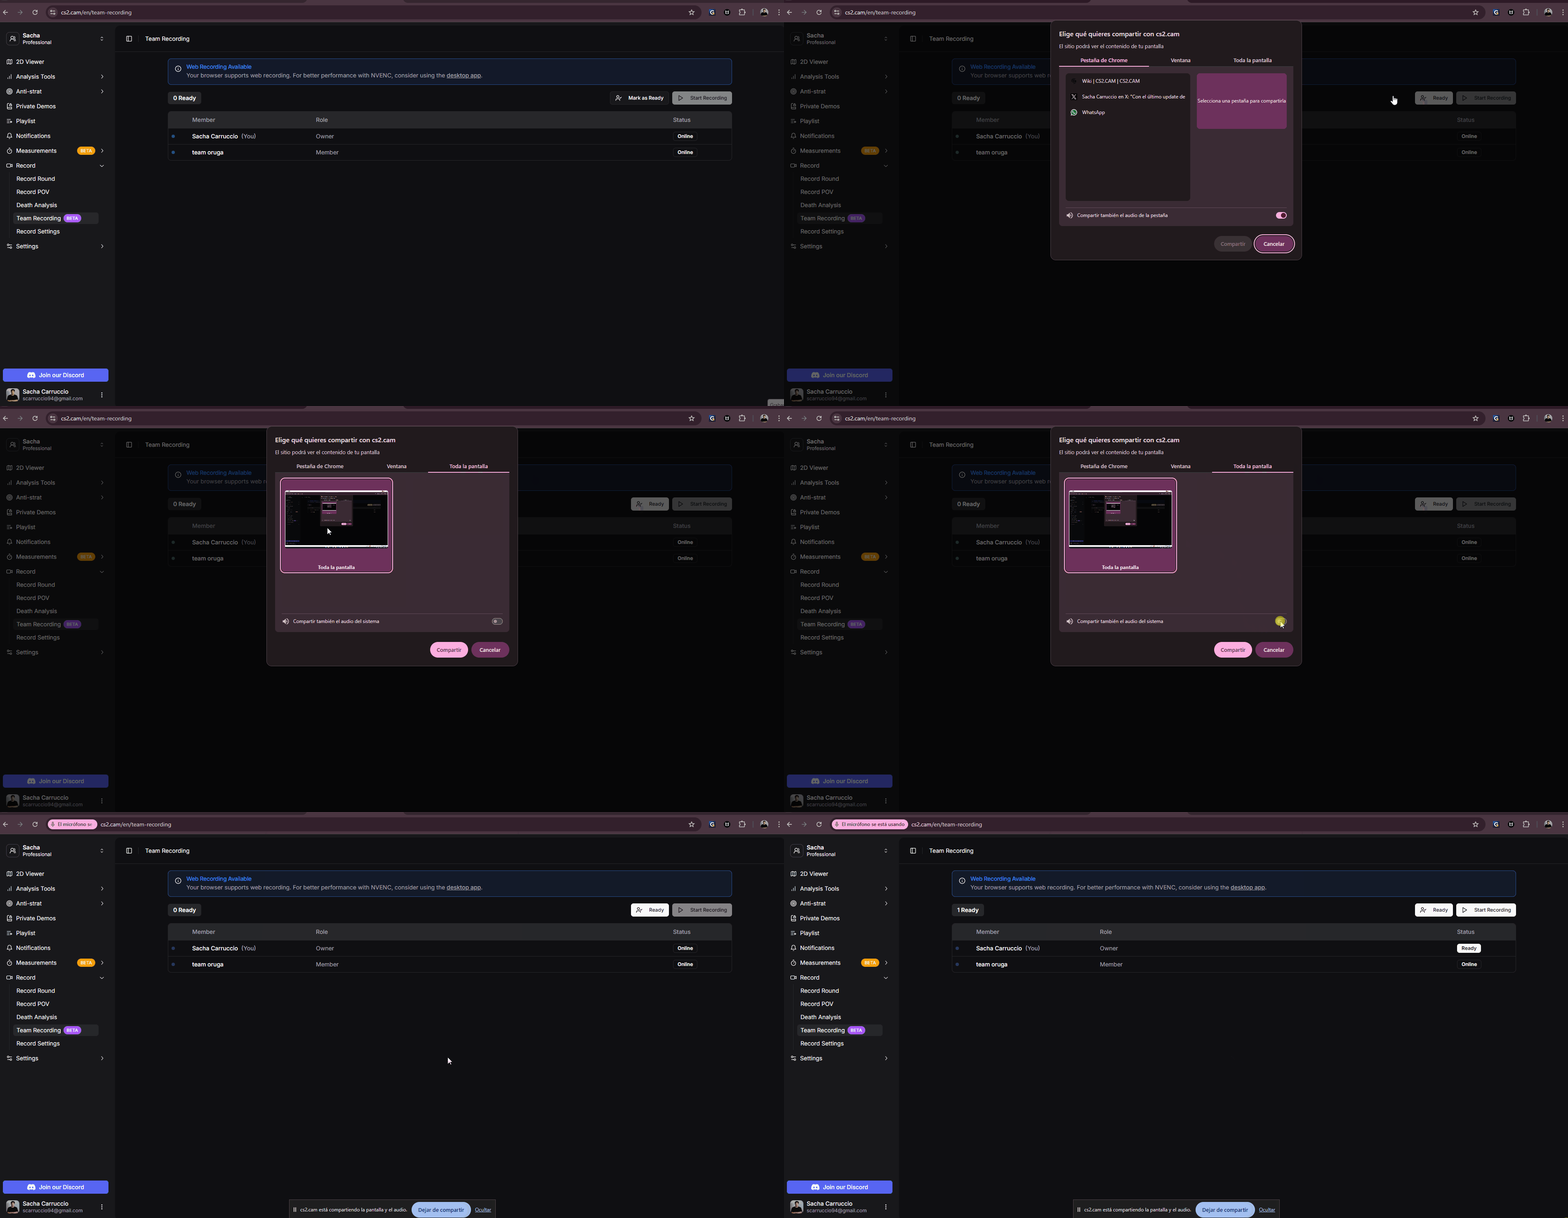
Setting up web recording with screen and audio sharing
The desktop app method uses a portable OBS Studio installation that comes pre-configured. Here's how to set it up:
Navigate to the Team Recording page from your team dashboard.
Click the Ready button. This will automatically open the pre-configured portable OBS Studio.
OBS will open minimized in the taskbar, already configured to capture CS2.
Once all players are ready, the recording will start automatically.
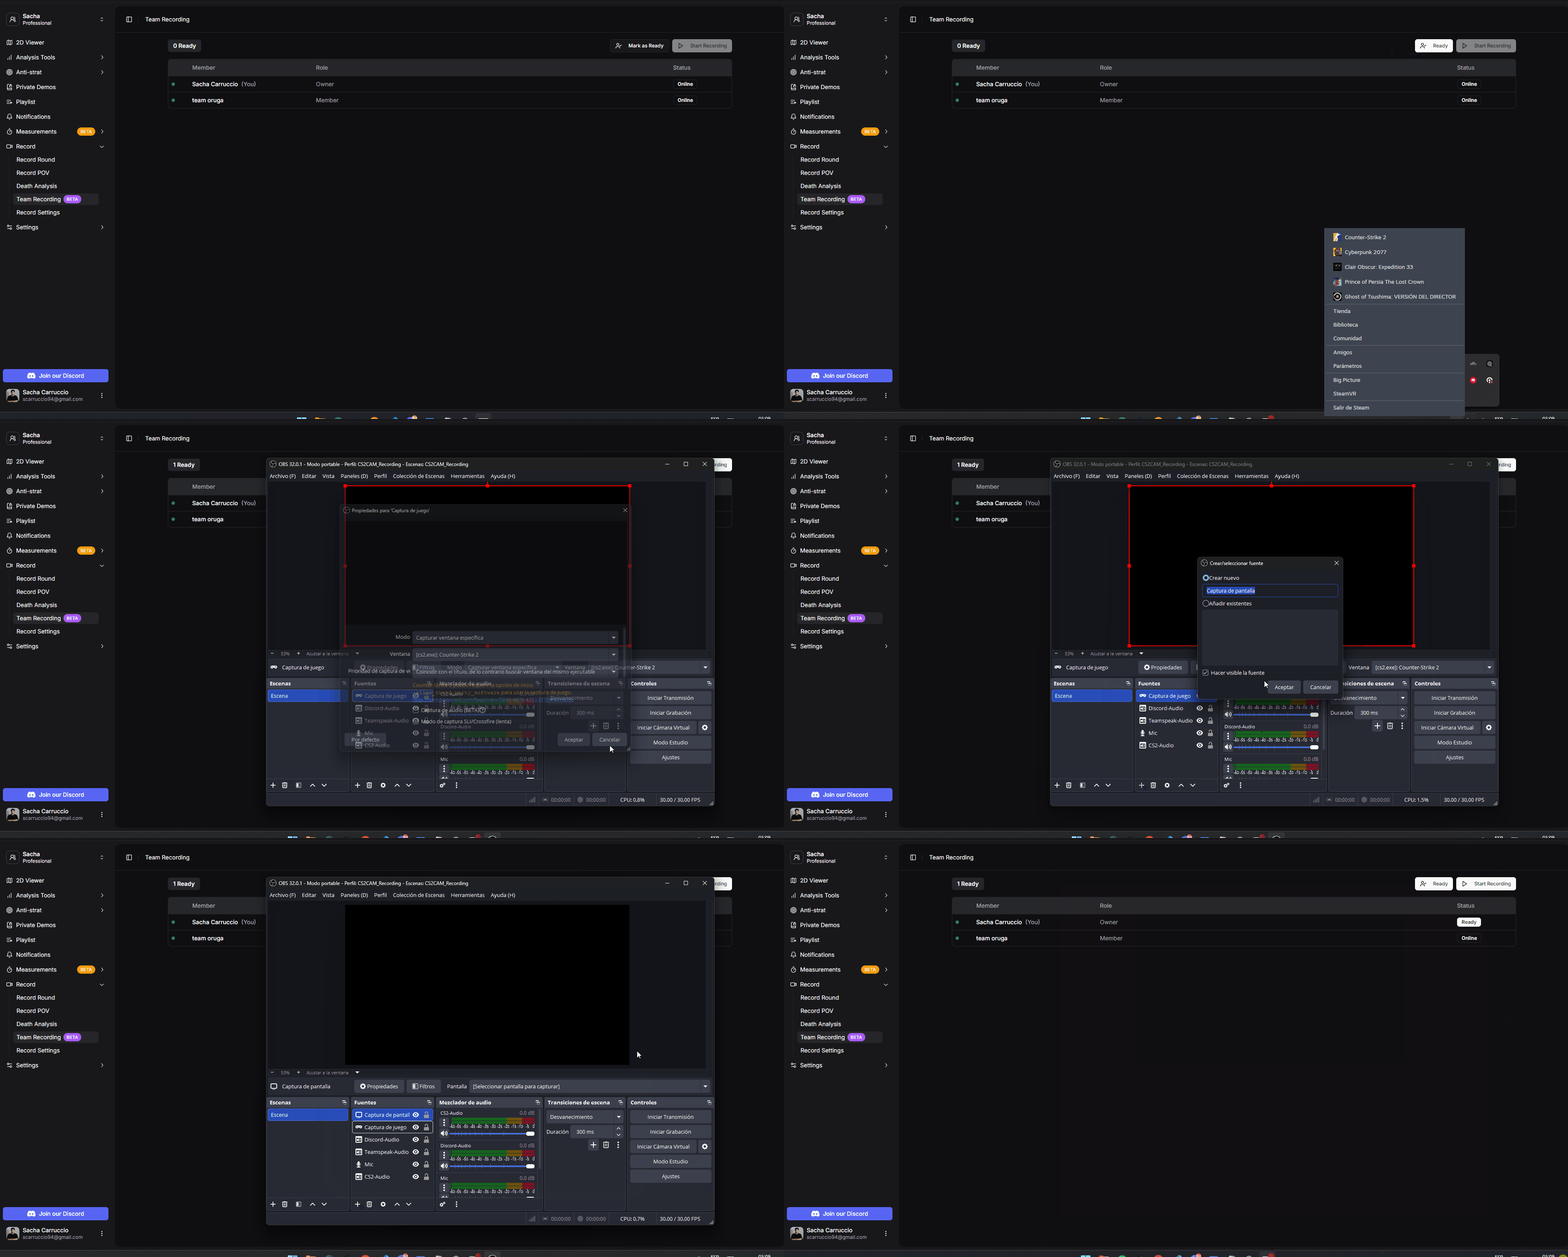
Setting up desktop recording with OBS Studio
If you see a black screen in OBS, try switching from 'Game Capture' to 'Display Capture' in the OBS source settings.
Once all players who want to record are ready, the recording can begin.
All team members who want their POV recorded must click the Ready button first.
Only ONE player needs to click the 'Start Recording' button. This will start the recording for everyone.
Recording starts synchronized for all 5 players automatically - no manual timing needed.
One of the unique features of Team Recording is live streaming all cameras to CS2.CAM servers.
All streams are private and only accessible by your team members on CS2.CAM.
Coaches or teammates who aren't playing can watch any player's camera in real-time during practice.
As soon as practice ends, the VODs are immediately available - no waiting for uploads or processing.
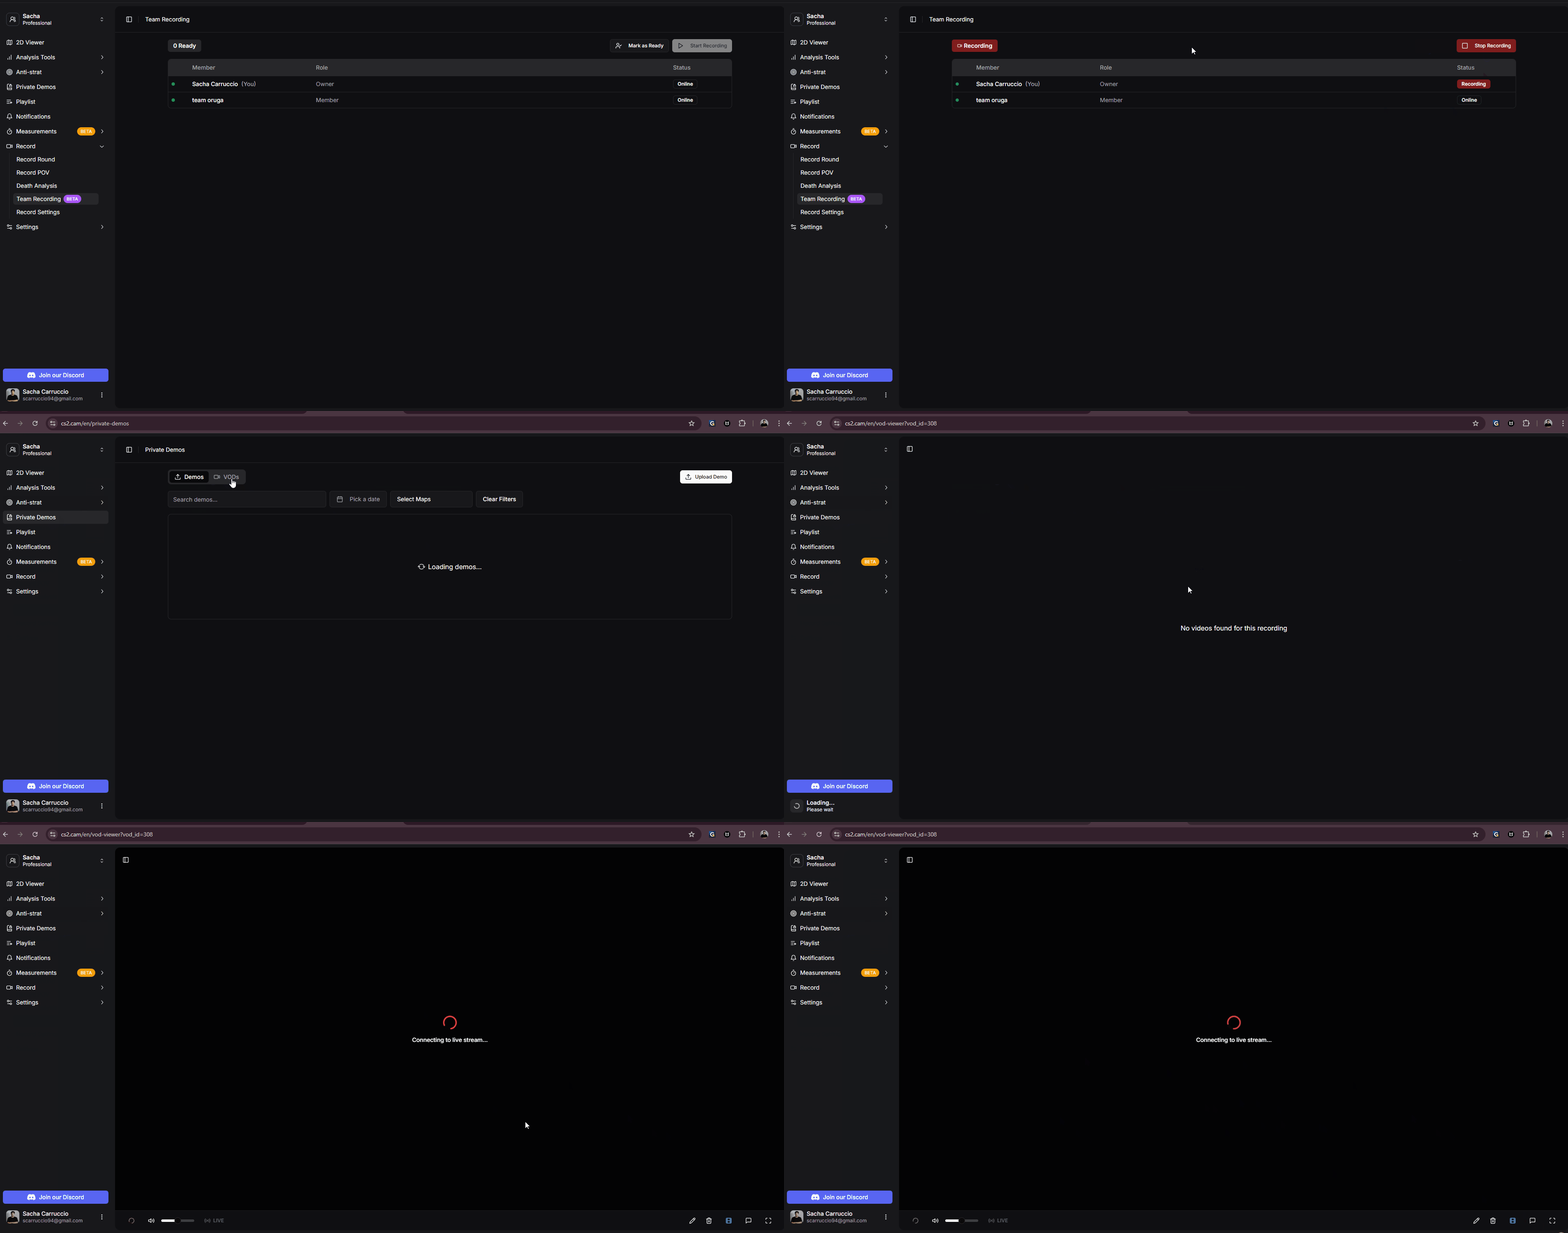
Live streaming all player cameras during practice
When practice is over, stopping the recording is just as simple as starting it.
Only ONE player needs to click the 'Stop Recording' button to end the session for everyone.
All player recordings stop at the same time, maintaining perfect sync across all VODs.
After practice, all recordings are available for review in your Private Demos section.
All recorded VODs appear in your Private Demos page, ready for review.
All player POVs are perfectly synchronized, allowing you to switch between perspectives at any moment.
View multiple player cameras simultaneously for comprehensive team analysis.
Use the same drawing tools available in the 2D viewer to draw on screen during review - perfect for illustrating strategies and mistakes.
Create notes and annotations at specific moments in the VOD. Team members can see and discuss these marked moments together.
Reviewing team recording VODs with multiple cameras
The review interface shows all recorded cameras. In this example, only one camera is shown because only one player was recording during the demo.
The VOD viewer includes the same powerful drawing and annotation tools you're familiar with from the 2D demo viewer:
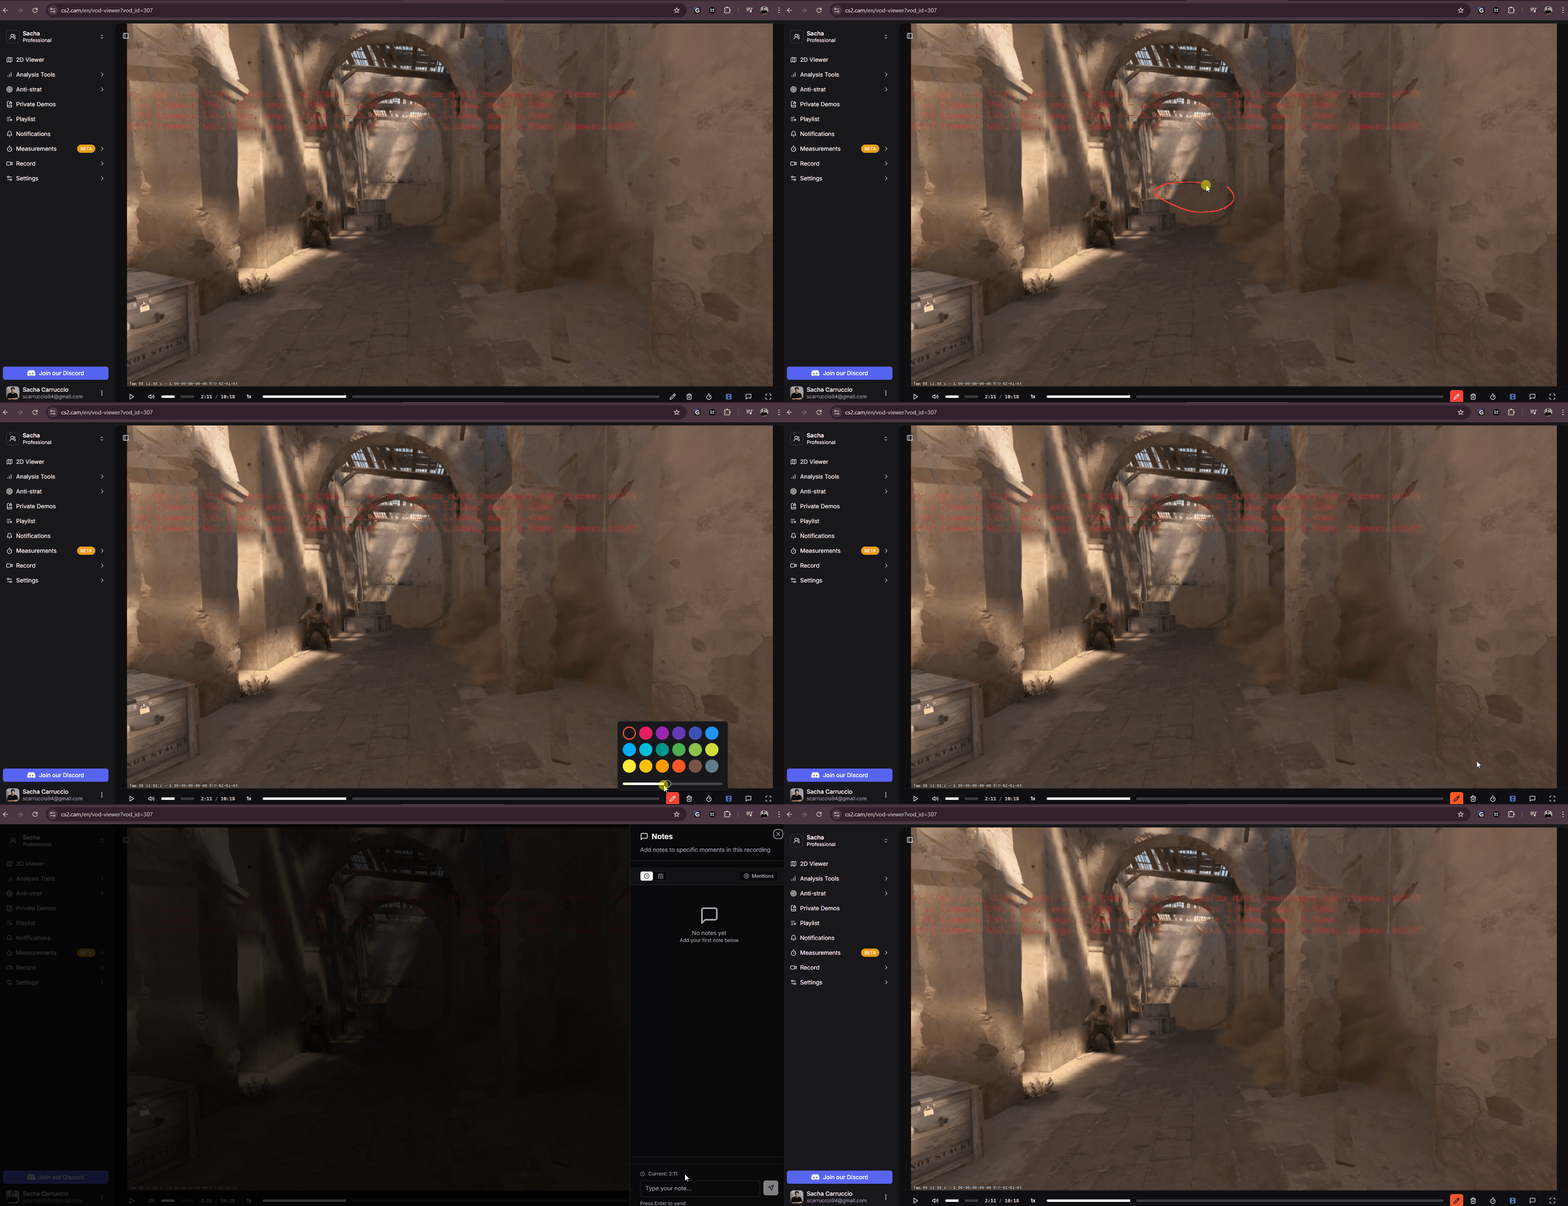
Drawing tools and annotations in the VOD viewer
If you have the GOTV demo from your practice session, you can sync it with the recorded POVs for the ultimate review experience.
Sync the GOTV demo with the 2D tactical viewer to see the full picture alongside player POVs.
Watch player POVs while simultaneously viewing the tactical 2D map overview for complete context.
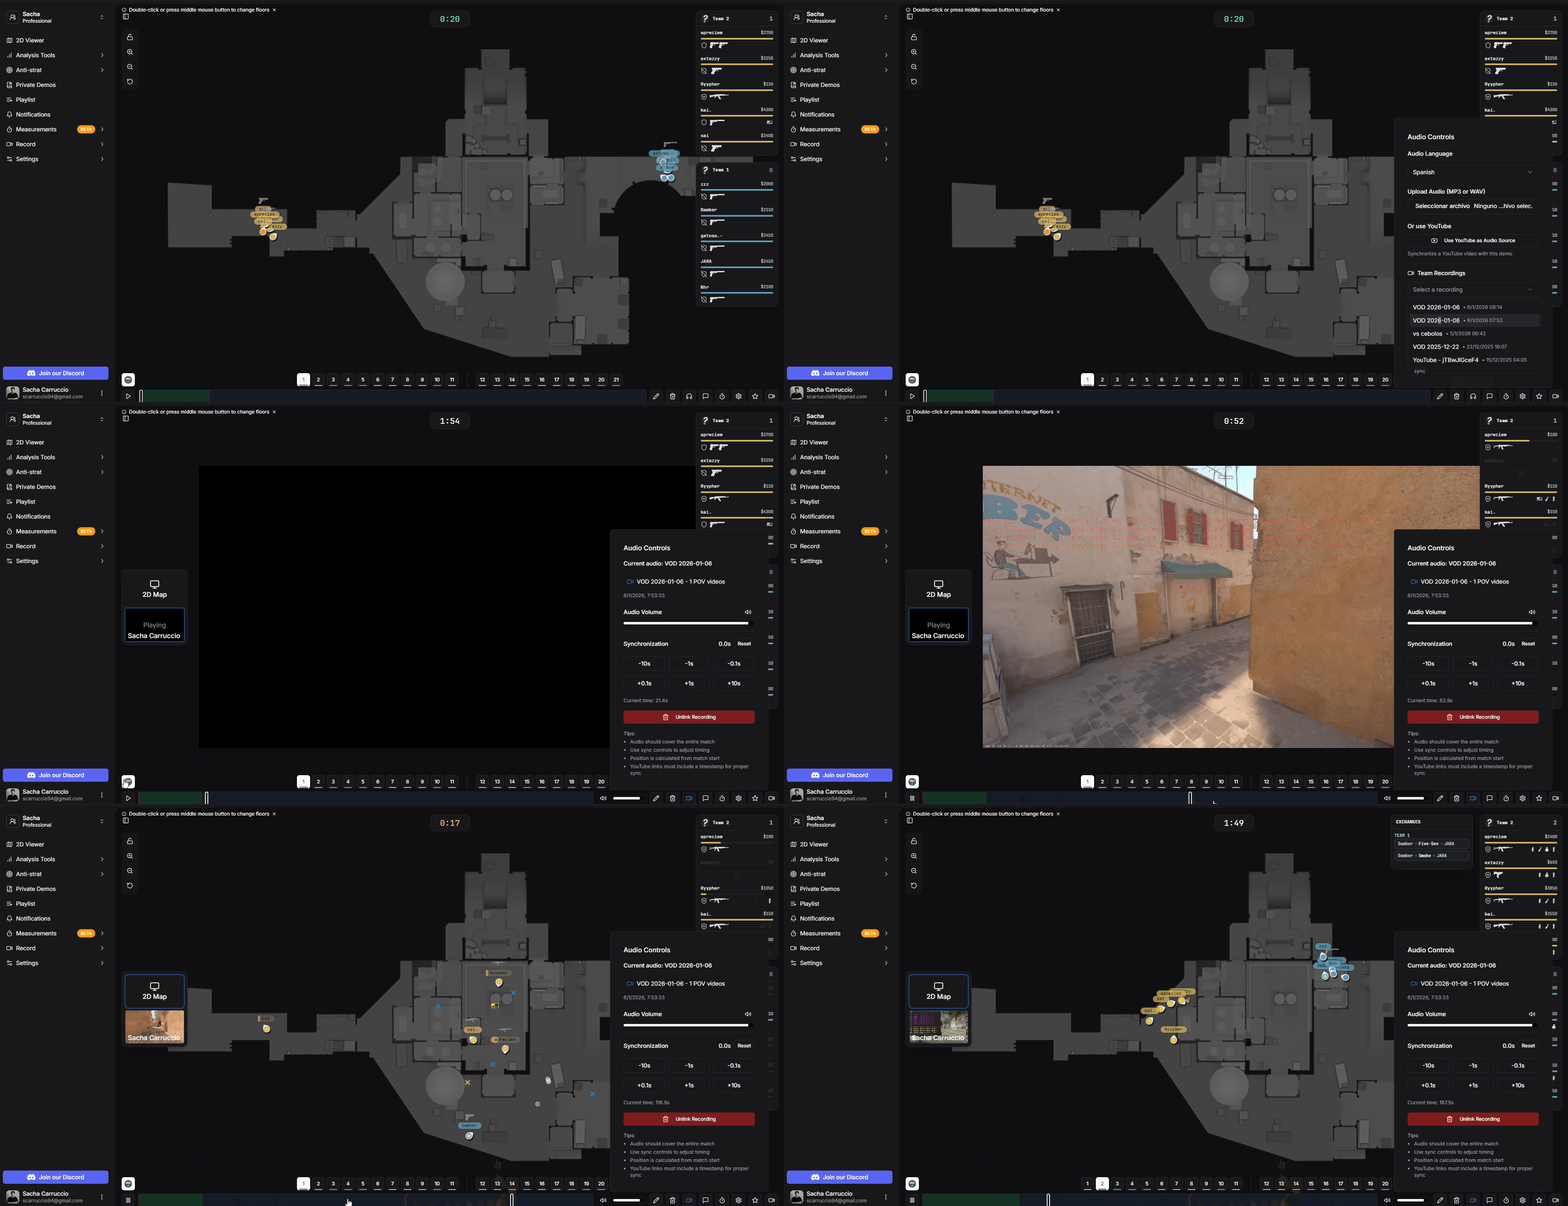
GOTV demo synced with team recording VODs and 2D viewer
Users with Team Recording access have dedicated support for any issues during setup or recording.
Free technical support through our Discord server for any problems you encounter during the recording process.
Optional one-on-one session where we explain the entire process and teach you how to use all the recording tools effectively.
We recommend doing a test recording of about 20 seconds before your first real practice. Once any issues are resolved, they typically stay fixed for future sessions.